← A Level Economics Revision · Home

The production possibility frontier — A-Level Economics
Play the game and get tested on every point of the diagram — every wrong answer gets a diagnosis. Then study the answers below. Measure what you don’t know, then fix what you don’t know.
The diagram
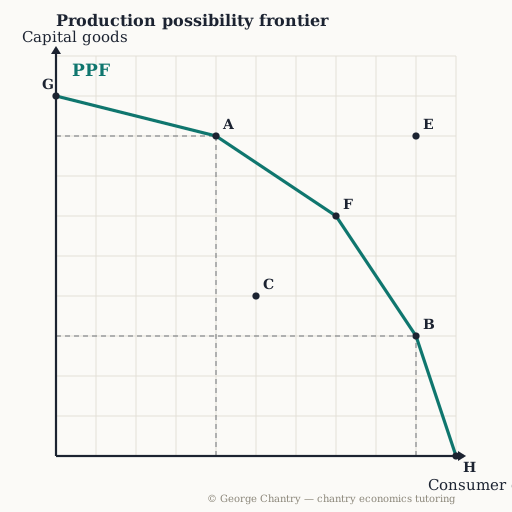
Capital goods run up the vertical axis, consumer goods along the horizontal one. The frontier bows outwards from G on the capital-goods axis down to H on the consumer-goods axis, passing through A (4 consumer, 8 capital), F and B (9 consumer, 3 capital) — every point on the curve uses all the economy’s resources. C sits inside the frontier and E sits outside it: this is the one diagram where the points that matter are deliberately off the line, because inside and outside ARE the lesson.
The game’s questions — with the answers explained on the diagram
These are the exact questions the game asks. Play first if you want the real test — or study them here with the answer for each one.
1. Which point shows an economy with UNEMPLOYED resources (productive inefficiency)?
C. Any point INSIDE the frontier means idle resources: the economy could have more of BOTH goods, available for free. (A and B are both on the frontier, so all resources are employed — they are just different output mixes; and E, outside the frontier, is unattainable rather than inefficient.)
2. Which point is currently UNATTAINABLE for this economy?
E. It sits beyond the frontier, exceeding today’s resources and technology. Only economic GROWTH gets you there — more resources or better technology shifting the whole PPF outwards. (A and F are on the frontier and so attainable at full employment; C is inside, attainable but wasteful.)
3. Moving from A (4 consumer, 8 capital) to B (9 consumer, 3 capital): what is the OPPORTUNITY COST?
5 units of capital goods. Opportunity cost is what you GIVE UP, not what you gain: capital goods fall from 8 at A to 3 at B, so the extra 5 consumer goods cost 5 capital goods — the next best alternative forgone. (Naming the 5 consumer goods you gained is the classic error; so is saying the cost is zero because both points are efficient, when efficient points still trade one good for the other.)
Now test yourself
Every corner has a letter. Answer with the points and areas, exactly like the exam. Every wrong answer gets a diagnosis — that is the diagram telling you what to fix.